
Cloudinary provides developers with SDKs in different languages both for the client and server-side to allow for easy integration and seamless management of all media manipulation concerns when building applications. These SDKs ship with well-written and optimized helper functions, URL builders, API wrappers, etc., ready to be used.
Although this applies to other languages, this article focuses on the Node.Js SDK. We will examine the different functions available to help us handle uploading media files to the cloud. We’ll go through some of these functions and when they could come in handy.
Here is a link to the demo CodeSandbox.
Create a new Next.js application using the following command:
npx create-next-app upload-tester
Run these commands to navigate into the project directory and install the required dependencies:
cd upload-tester
npm install cloudinary axios multer
The Cloudinary Node SDK will provide easy-to-use methods to interact with the Cloudinary APIs, axios will serve as our HTTP client, while Multer will be used to parse files.
Let’s also create a file called uploadFunctions.js, where we will store some functions. Run this command at the root of your working directory:
touch uploadFunctions.js
Code language: CSS (css)First, sign up for a free Cloudinary account if you don’t have one already. Displayed on your account’s Management Console (aka Dashboard) are important details: your cloud name, API key, etc.

Our public credentials, i.e., our cloud name and API key, will be used to set up the SDK, while the API secret, which is a private credential, will be used to sign requests made to the cloudinary servers. We are also provided with the API Environment variable, which is a URL formed using the Cloudinary credentials.
Create a file called .env at the root of your project and copy the API Environment variable to it:
CLOUDINARY_URL=cloudinary://<API-KEY>:<API-SECRET>@<CLOUD-NAME>
Code language: HTML, XML (xml)It is important to note that all our uploads will be done using a Cloudinary account on the free plan. All Cloudinary account types (free or paid) have certain limitations, which can be seen in the settings section on the dashboard, as shown in the image below.
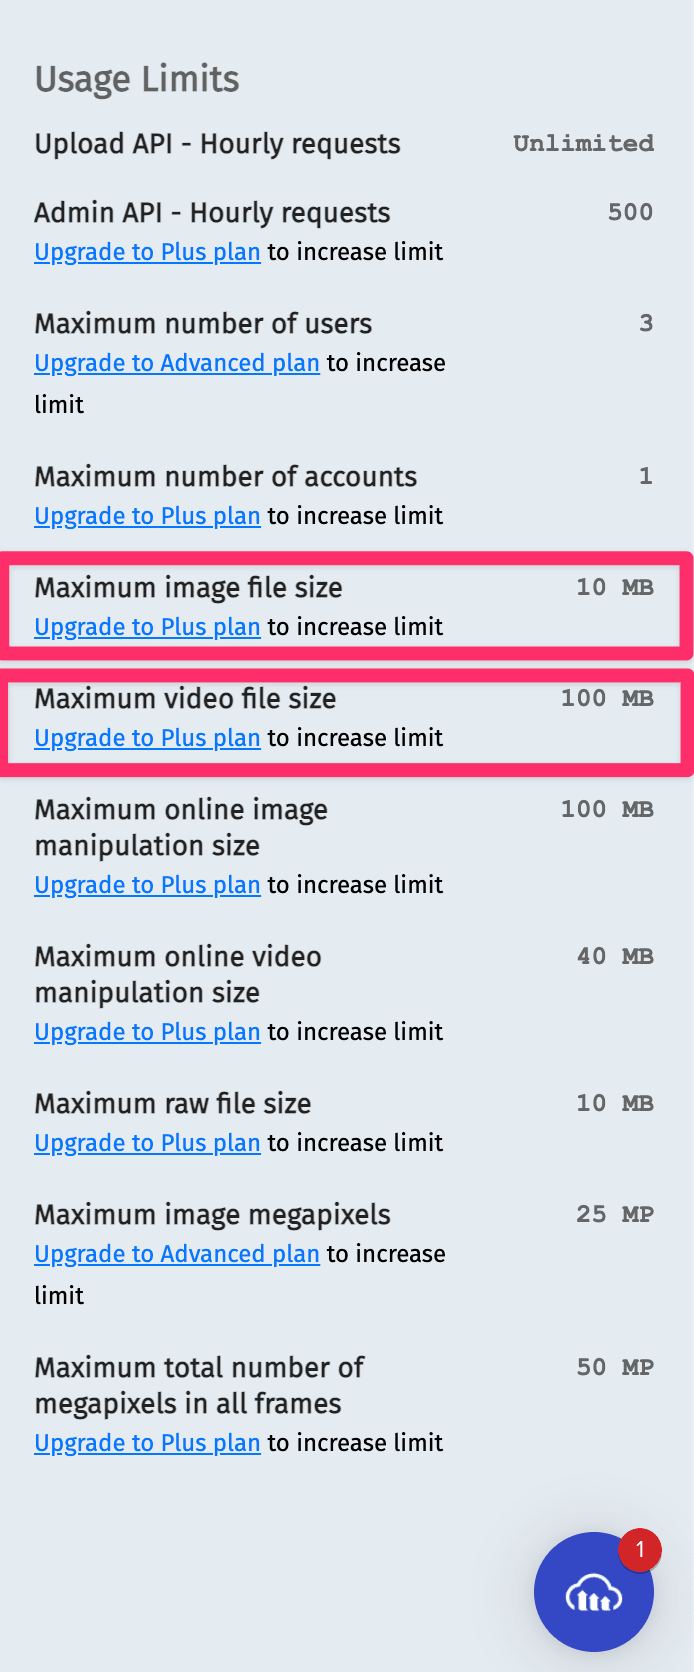
Although there are multiple limitations for a free account, the ones that interest us more are the maximum upload file size limits for images and videos. It is currently capped at 10MB and 100MB, respectively. You can always upgrade to the plus plan to get 20MB for images and up to 2GB for videos.
The Cloudinary documentation points out two functions that should be used for file uploads, the upload function and the upload_large function. These two functions form the basis for all other functions we will discuss here. We will examine them one by one, their basic signature, give brief details about what they do internally and other functions they wrap.
The upload function has the following signature:
upload(File, options, callback);
The File parameter represents the file source, which could be one of the following:
- A path to a file on your local machine.
- A URL to some remote file on the internet
- A base 64 encoded Data URI.
- A URL from some private storage bucket
- An FTP URL
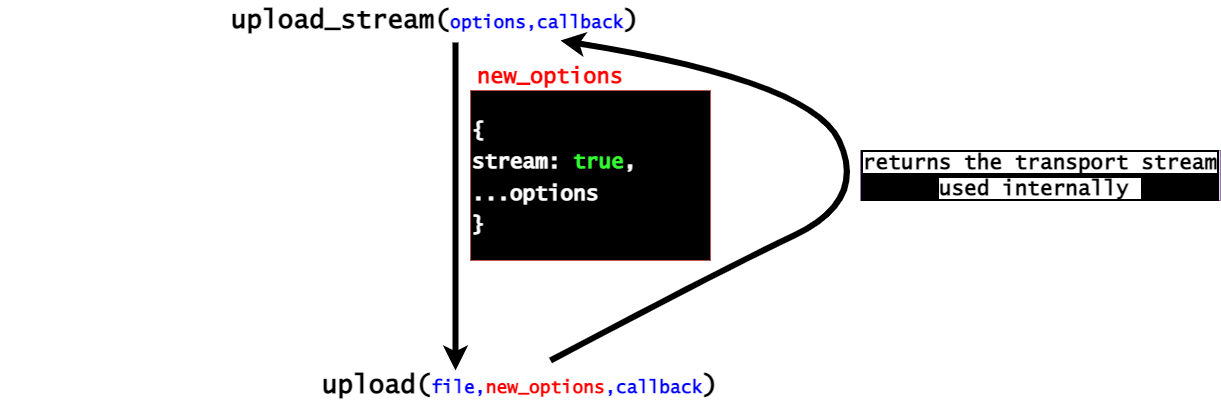
The options parameter defines the specific options you want for the uploaded file, such as the type of the asset(image, video, or raw), its public identifier, and specific transformations you want to be applied to the asset, e.t.c. It also determines what the upload function returns to the caller and specific behaviors as to how it will handle the file uploads. Internally, the upload function calls several other functions to handle the file upload, and two of them are the call_api and post functions, as shown in the diagram below:

The call_api function does several things, such as constructing the URL with the correct endpoint to make the upload. It also uses the options object to construct and then encode all necessary parameters required to make the request to upload the file in the post function and defines and feeds a handler function that handles the upload call.
The post method internally then constructs all the necessary request headers for the request. Since it is uploading a file, one of the requests header noteworthy is the content-type header, which is set to multipart/form-data encoding for binary data.
To properly include the file data in the request body internally, the post function maintains a Transform stream that reads the input file as a stream, converts it then channels it to the request body to upload the file. If the file upload succeeds or fails, the response is sent to the callback it gets from the call_api method, which returns the result to the caller or returns the result as a promise depending on how the upload function is called.
Now, let’s update the content of our uploadFunctions.js file to show a simple use of the upload function:
const cloudinary = require("cloudinary").v2;
cloudinary.config();
const options = {
  resource_type: "auto",
};

export async function uploadDefault(dataURI) {
  return cloudinary.uploader.upload(dataURI, options);
}
Code language: JavaScript (javascript)
In the above code, we start by setting up the Cloudinary SDK using its config method. Next, we defined one option we would need for all the files we would upload. Since we expect our function to run with any file, we set the resource_type to auto so that the file type will be automatically detected.
Then we define and export a function called uploadDefault, which accepts a data URI of a file here as an input, invokes the upload function, and returns the response.
Other functions also directly or indirectly wrap the upload function. They modify the contents of the options parameter passed to them to include one or more properties before invoking the upload function. Some of them include:
- unsigned_upload
- upload_stream
- upload_large
Let’s take a look at each of them.
This function has the following signature:
unsigned_upload(file, upload_preset, (options = {}), callback);

The new parameter here is the upload_preset. The presence of an unsigned upload preset allows you to upload assets without needing your API secret credential. The unsigned_upload function calls the upload function and creates an object with two extra properties, which are:
{
  unsigned: true,
  upload_preset: upload _preset
}
Code language: CSS (css)
This object is then combined with the ones defined in the options object and used to invoke the upload function. When we add an upload preset, the upload function doesn’t generate any signature to authenticate the request. This function can be called without using your API secret credential to configure the SDK.
This function has the following signature:
upload_stream((options = {}), callback);
This function has similar parameters to the upload function. Internally, it defines an object that looks like this:
{
  stream: true;
}
Code language: CSS (css)
This object is then merged with the options object parameter internally and is then used to invoke the upload function. You may have noticed that this function signature doesn’t include a file as its parameter. Remember I said that within the upload function, the file to be uploaded is included in the request body using a transform stream. By setting the stream boolean to true, the upload_stream call returns that transform stream used internally, and this is what is stored in the TransformStream variable as shown below. Add the following to your uploadFunctions.js file:
const { Readable } = require("stream");

export async function uploadStream(buffer) {
  return new Promise((res, rej) => {
    const theTransformStream = cloudinary.uploader.upload_stream(
      options,
      (err, result) => {
        if (err) return rej(err);
        res(result);
      }
    );
    let str = Readable.from(buffer);
    str.pipe(theTransformStream);
  });
}
Code language: JavaScript (javascript)
It is now the caller’s responsibility to create the readable stream from the file to be uploaded (we did this using the str variable above) and then feed its contents to the transform stream from the upload_stream call. The transform stream, in turn, includes the file in the request body and then proceeds to upload it.
The upload_large function has the same function signature as the upload function.
upload_large(file, options, callback);
You may wonder what the difference between the two functions is since they have the same signatures. They are similar in that they communicate with the same API endpoint and are wired to upload files. Also, when the file uploaded is remote, the upload_large function behaves exactly like the former. The main differences between these two functions stem from various parameters.
Firstly, the use case for the upload_large function is that it is configured to allow the uploading of large files, mostly videos of large sizes.
The upload_large function offers a high degree of tolerance to network issues that may arise when uploading some files. How it achieves this is that instead of directly uploading files in a single request to the server, it uploads the file in chunks. The size of the chunks is defined in the options object via a chunk_size property. The chunk size has a default size of 20MB and can be scaled as needed but must be greater than 5MB. below is a sample error you get when you set the chunk size to a value that is less than 5MB.

To understand a bit of what happens internally, let us take a look at some basic function calls that are involved in the upload_large call.
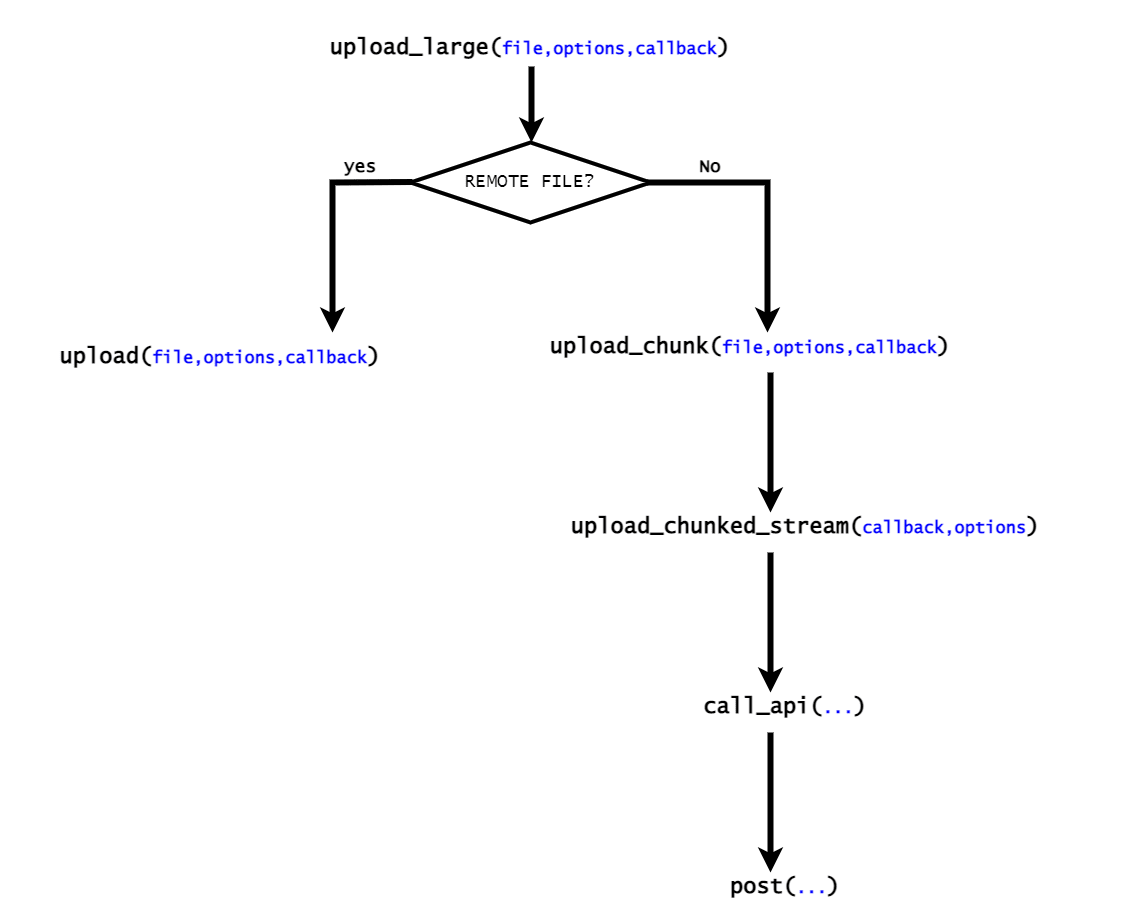
As shown above, when the file to be uploaded is not a remote file, it invokes the upload_chunk function, modifies the options object, and except explicitly stated, it assumes that the asset type is raw (this is a type assigned to any file that is not an image or a video).
The upload_chunk function internally creates a readable stream from the input file. To upload the contents of this stream, it pipes its content to a writable stream returned from calling the upload_chunked_stream function. This writable is set up to maintain a buffer internally. As soon as the data flows in its buffer and is up to the chunk size, corresponding calls to call_api and post are made to upload that piece of the file. This process is repeated for each chunk until the entire file is uploaded.
When constructing the request for each chunk, to inform the upload server about the progress status of the chunk of the file being uploaded in relation to the original file’s size, it also includes the content-range HTTP headers to indicate that. e.g., say we are uploading a 14MB file, and we define a chunk size of 6MB, meaning we will be uploading three chunks 6MB, 6MB, and 2MB.
The following will be the content-range header for each chunk:
content-range: bytes 0-5999999/-1 // zero index so 0 to 5999999 bytes means 6MB


content-range: bytes 6000000-11999999/-1 // another 6MB


content-range: bytes 12000000-13999999/14000000 // the remaining 2MB
Now that we have understood the upload_large function, let’s proceed to update our uploadFunction.js file to use it as shown below:
export async function chunkedUpload(dataURI) {
  return cloudinary.uploader.upload_large(dataURI, options);
}
Code language: JavaScript (javascript)
We named our function chunkedUpload; this function will expect a data URI that will be used to invoke the upload_large function and return the response.
Now that we have seen how the different upload functions work let’s create an API route that handles requests to upload files using these functions. Within the pages/api directory, create a file called upload.js using the following command:
touch upload.js
Code language: CSS (css)
Let’s update its contents to match the following:
import multer from "multer";
import {
  uploadStream,
  chunkedUpload,
  uploadDefault,
} from "../../uploadFunctions";

const storage = multer.memoryStorage();
const upload = multer({ storage });
const myUploadMiddleware = upload.single("my_file");
function runMiddleware(fn, req, res) {
  return new Promise((resolve, reject) => {
    fn(req, res, (result) => {
      if (result instanceof Error) {
        return reject(result);
      }
      return resolve(result);
    });
  });
}

const handler = async (req, res) => {
  try {
    await runMiddleware(myUploadMiddleware, req, res);
    const b64 = Buffer.from(req.file.buffer).toString("base64");
    let dataURI = "data:" + req.file.mimetype + ";base64," + b64;
    let cldRes = await uploadStream(req.file.buffer, res);
    switch (req.body.upload_func) {
      case "upload_stream": {
        cldRes = await uploadStream(req.file.buffer);
        break;
      }
      case "upload_large": {
        cldRes = await chunkedUpload(dataURI);
        break;
      }
      default: {
        cldRes = await uploadDefault(dataURI);
      }
    }
    res.json(cldRes);
  } catch (error) {
    console.log(error);
    res.send({
      message: error.message,
    });
  }
};

export default handler;
export const config = {
  api: {
    bodyParser: false,
  },
};
Code language: JavaScript (javascript)
In the code above, we start by bringing the necessary imports — the Multer middleware and our utility functions. Next, we will set up the Multer middleware to use the memory storage option. Next, we created the Multer instance and initialized it with the storage option. We set up a function (upload.single(“my_file”)) for it to parse a single file called “my_file” in the request body.
Next, we create a helper function that will allow us to run our Multer middleware called runMiddleware. This function accepts three parameters: a middleware, the request, and response objects. It returns a promise that resolves when the middleware callback runs successfully or fails with an error otherwise.
Next, we define and export a handler function that will be triggered by any HTTP request made to this API route. This function starts by parsing the files contained in the request body using the Multer middleware. Apart from the file, the request body also includes a property called upload_func, which is a string used to determine which of our upload functions to call. The chunkedUpload and uploadDefault functions both receive a base64 encoded data URI of the file as inputs, while the uploadStream function gets the raw file buffer.
Irrespective of the function called, we get the same response we store in a variable called cldRes and send it back to the client. If an error occurs, it also returns the appropriate response.
By default, all API Route handler functions provide us with middleware under the hood that automatically parses the contents of the request body, cookies, and queries. This means that by default, we don’t consume the raw request body stream, and we need that because the Multer middleware is supposed to parse files contained in the raw, unadulterated request object. As a final step, we export an object that opts out of the prebaked middlewares used by Next.js o that our handler function receives the raw request stream.
Now, let’s build a simple frontend application where we can select some files to upload to our server. Update the content of your pages/index.js file with the following:
import { useState } from "react";
import axios from "axios";

export default function IndexPage() {
  const [loading, setLoading] = useState(false);
  const [res, setRes] = useState({});
  const [file, setFile] = useState(null);
  const [uploadType, setUploadType] = useState("");

  const handleSelectFile = (e) => setFile(e.target.files[0]);

  const uploadFile = async (e) => {
    setLoading(true);
    e.preventDefault();
    const data = new FormData();
    console.log(file);
    data.set("my_file", file);
    data.set("upload_func", uploadType);
    try {
      const res = await axios.post("/api/upload", data);
      setRes(res.data);
    } catch (error) {
      console.log(error);
    } finally {
      setLoading(false);
    }
  };

  return (
    <div className="App">
      <label htmlFor="file" className="btn-grey">
        {" "}
        select file
      </label>
      <input
        id="file"
        type="file"
        onChange={handleSelectFile}
        multiple={false}
      />
      <div>
        <select
          value={uploadType}
          onChange={({ target: { value } }) => setUploadType(value)}
        >
          <option value="default_upload"> Default</option>
          <option value="upload_stream">Upload stream</option>
          <option value="upload_large"> Upload large</option>
        </select>
      </div>
      {file && <p className="file_name">{file.name}</p>}
      <code>
        {Object.keys(res).map(
          (key) =>
            key && (
              <p className="output-item" key={key}>
                <span>{key}:</span>
                <span>
                  {typeof res[key] === "object" ? "object" : res[key]}
                </span>
              </p>
            )
        )}
      </code>
      {file && (
        <>
          <button className="btn-green" onClick={uploadFile}>
            {loading ? "uploading..." : "upload to Cloudinary"}
          </button>
        </>
      )}
    </div>
  );
}
Code language: PHP (php)
This component renders two input fields, one for selecting the file to be uploaded, and the other is a dropdown for choosing the upload type. We also included a button that triggers a function called uploadFile, which constructs the request payload using the selected file and the upload type. Next, it attempts to make an HTTP request to our API route to upload the file. Once the upload call succeeds, the response is stored in state in a variable called res, then the content of the response is rendered to the screen.
To give our app a decent look, copy the styles in this codeSandbox link to your global.css file in the styles directory.
Start your application on http://localhost:3000/ with the following command:
npm run dev
Once the app is up and running, you should be able to select a file, upload it and see the response displayed.

Next.js API routes accept a maximum payload size of 5MB, so keep the payload within that range when testing on the frontend to avoid 413 errors. To upload larger files, you can always move the code to a different environment, but ensure that the file sizes are within the limits of your Cloudinary account plan.
Find the complete project here on GitHub.
In this article, we closely examined the Cloudinary Node.js SDK and the various functions it provides us with to handle file uploads. This guide shows us how to take advantage of the SDK to handle our upload concerns.
Resources you may find helpful:
